|
<< Click to Display Table of Contents >> Setting printer properties |
  
|
|
<< Click to Display Table of Contents >> Setting printer properties |
|
Dispatch usually instructs your printer to print tickets using its Custom (user-defined) paper. By default, the Custom paper size is .1 inches wide and .1 inches long. Dispatch needs a printing area that is a minimum of 8.5 inches wide and 5.5 inches long, therefore, the Custom page size must be set to at least that size. This document describes how to set the Custom page size using the Printer Properties dialog.
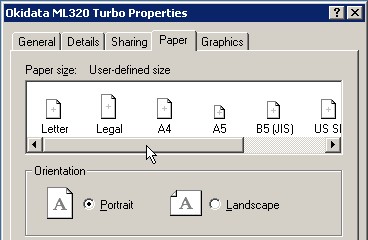
Click Start > Settings > Printers to open the Printers folder. Select your printer (click it once), click File, and then click Properties to open the printer Properties dialog. The properties dialog for the Okidata ML320 Turbo printer is shown below.

Select the Paper tab.

With your mouse, drag the scroll bar for the Paper size list as far to the right as it will go. You should see an icon with the caption Custom.

Click the Custom icon once to open the User-Defined Size dialog.

The User-Defined Size dialog is used to set the Custom paper size. The default paper size is 0.5 inches wide and 0.5 inches in length. Before proceeding make sure that the Unit is set to 0.01 inches as shown at the right on the screen shot below.

In order to print correctly, the paper size must match the size of the ticket you want Dispatch to print. The default Dispatch ticket is 8.5 inches wide and 5.5 inches in length. At the Width prompt, type 850 and then press the Tab key. At the Length prompt, type 550 and then press the Tab key.

Click OK to close the User-Defined Size dialog. At this point in time your printers default paper size is set to Custom. Anything that is printed to this printer will be formatted for an 8.5 by 5.5 inch page.
To reset the printers default paper size, drag the scroll bar for the Paper size list as far to the left as it will go.
Click the Letter icon once. Your printers default paper size will now be Letter.

Click OK again to close the printers Properties dialog.
To close the Printers folder, click File > Exit.